I will introduce a quick way to publish your blog with hugo.
Summary
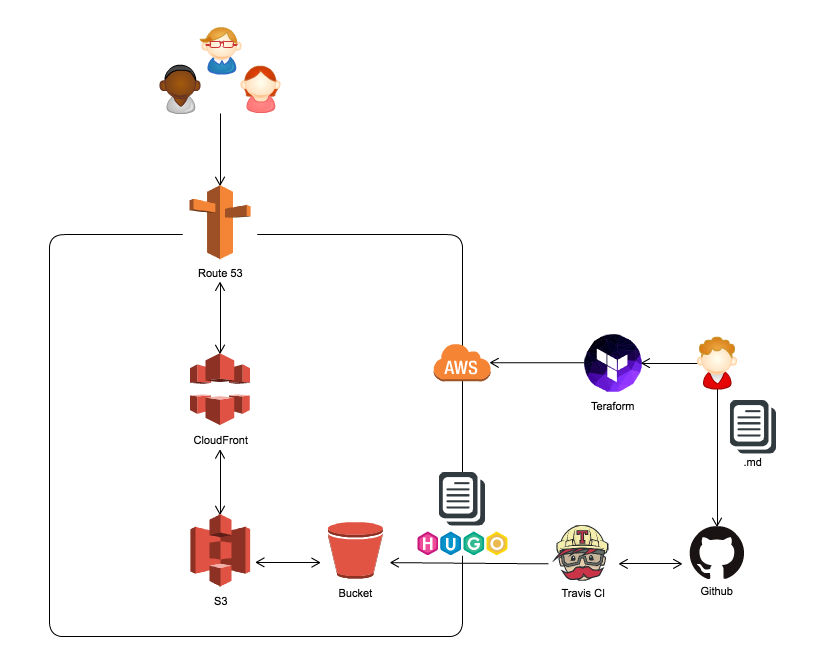
- Execute the terraform’s provisioning script to build the environment of AWS.
- Push markdown format articles to Github.
- Travis CI will automatically generate a static site from markdown with hugo and upload it to S3 Bucket.
Please see the following diagram that shows its structure.

By the way, I made this diagram using my company’s product “Cacoo”. It’s online drawing tool, please give it a try. https://cacoo.com/
1. Preparations in advance
Would you please purchase the own domain and request a SSL certificate at AWS Certificate Manager? If you have already obtained a SSL certificate, you can also import it. That SSL certificate will be applied to the CloudFront.
Be careful, please select N.Virginia fo region. N.Virginia is the only region that can be applied to CloudFront.
2. Provisioning infrastructure
You can prepare it from the AWS console, but it will automatically build on your AWS using Terraform.
Teraform is HashiCorp’s tool for automating infrastructure building and setting using code. https://www.terraform.io/
It’s very simple!
# Installing Terraform. If you are using a Mac.
$ brew install terraform

# Generate and show an execution plan(dry-run)
$ terraform plan

# Builds or changes infrastructure
$ terraform apply
Just run the script below in the same directory. You can enter necessary values interactively.
setup.tf
variable "access_key" {
  description = "AWS access key"
}

variable "secret_key" {
  description = "AWS secret access key"
}

variable "region" {
  description = "AWS region to host your network"
}

variable "root_domain" {
  description = "Your root domain name"
}

variable "sub_domain" {
  description = "Your sub domain prefix"
}

provider "aws" {
  access_key = "${var.access_key}"
  secret_key = "${var.secret_key}"
  region = "${var.region}"
}

resource "aws_s3_bucket" "site" {
  bucket = "${sub_domain}.${var.root_domain}"
  region = "${var.region}"
  policy = <<EOF
{
  "Version": "2012-10-17",
  "Statement": [{
    "Sid": "PublicReadForGetBucketObjects",
    "Effect": "Allow",
    "Principal": { "AWS": "*" },
    "Action": "s3:GetObject",
    "Resource": "arn:aws:s3:::${sub_domain}.${var.root_domain}/*"
  }]
}
EOF
  website {
    index_document = "index.html"
    error_document = "404.html"
  }
}

data "aws_acm_certificate" "acm" {
  domain = "${sub_domain}.${var.root_domain}"
  statuses = ["ISSUED"]
}

resource "aws_cloudfront_distribution" "cdn" {
  enabled = true
  comment = "${sub_domain}.${var.root_domain}"
  default_root_object = "index.html"
  price_class = "PriceClass_200"
  retain_on_delete = true
  aliases = ["${sub_domain}.${var.root_domain}"]
  origin {
    domain_name = "${aws_s3_bucket.site.website_endpoint}"
    origin_id = "${sub_domain}.${var.root_domain}"
    custom_origin_config {
      http_port = "80"
      https_port = "443"
      origin_protocol_policy = "http-only"
      origin_ssl_protocols = ["TLSv1", "TLSv1.1", "TLSv1.2"]
    }
  }
  default_cache_behavior {
    allowed_methods  = ["GET", "HEAD"]
    cached_methods = ["GET", "HEAD"]
    target_origin_id = "${aws_s3_bucket.site.id}"
    compress = true
    forwarded_values {
      query_string = false
      cookies {
        forward = "none"
      }
    }
    viewer_protocol_policy = "redirect-to-https"
    min_ttl = 0
    default_ttl = 3600
    max_ttl = 86400
  }
  restrictions {
    geo_restriction {
      restriction_type = "none"
    }
  }
  viewer_certificate {
    acm_certificate_arn = "${data.aws_acm_certificate.acm.arn}"
    ssl_support_method = "sni-only"
    minimum_protocol_version = "TLSv1"
  }
}

resource "aws_route53_zone" "primary" {
  name = "${var.root_domain}"
}

resource "aws_route53_record" "dns" {
  zone_id = "${aws_route53_zone.primary.zone_id}"
  name = "${var.sub_domain}"
  type = "CNAME"
  ttl = "300"
  records = ["${aws_cloudfront_distribution.cdn.domain_name}"]
}
3. Setting Travis CI
Travis CI sees .travis.yml file in the root of your repository. And we should not forget setting AWS_ACCESS_KEY_ID and AWS_SECRET_ACCESS_KEY to environment variables in Travis CI.
URL: https://travis-ci.org/${user_name}/${repository_name}/settings
The setting below will automatically generate a static site from markdown with hugo and upload it to S3 Bucket.
.travis.yml
branches:
  only:
    - master
language: go
install:
- go get -v github.com/spf13/hugo
- sudo pip install s3cmd
script:
- hugo
- s3cmd --acl-public --delete-removed --no-progress sync public/ s3://${YOUR_BUCKET_NAME}
notifications:
  email:
    recipients: one@example.com
    on_failure: always
About s3cmd option.
--acl-public: Store objects with allowing read for anyone.--delete-removed: Delete remote objects with no corresponding local file.sync: Synchronize a directory tree to S3.
4. Let’s get started your own blog.
It only push articles you wrote to the Github repository. How to set up the hugo.
Leave the troublesome work to the computer, and we will concentrate on writing a lot of articles in English.
Thanks!